


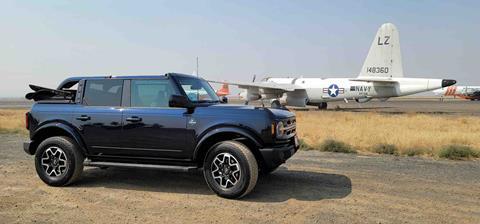
After thoroughly testing out the stock Non-Sasquatch, 2021 Outer Banks Ford Bronco for 18 months and over 42,000 miles, it was time to install the Bilstein B8 6112 upgrade kit and bring Sasquatch package capability to our Bronco.
While getting ready for OVR’s launch, we purchased this Ford Bronco in September 2021 and immediately went about putting on the miles. From trips to Overland Expo West in Flagstaff, AZ and Overland Expo PNW in Redmond, OR, to fishing and hunting trips in Baja Mexico and Arizona, to dispersed camping wherever the whim took us, the Bronco made some backcountry terrain accessible and helped us create amazing experiences and memories with our family and friends during the crazy Covid years.
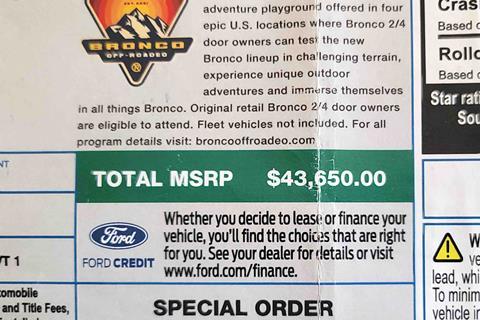
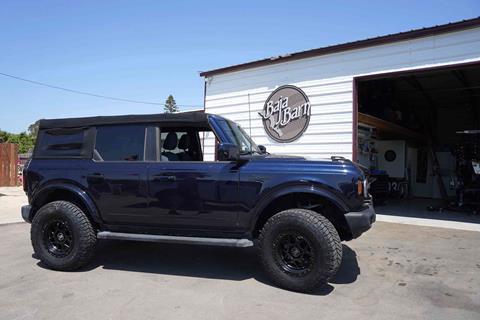
This particular stock ’21 Outer Banks edition Ford Bronco is a non-factory Sasquatch model, mid-package (Equipment Group 312A), 4-cylinder 2.3 liter, 4-door, soft top. It was optioned out in a beautiful Anti-Matter Blue color and came with 18” black painted aluminum wheels with P255/70R18 Bridgestone Dueler AT (32”) tires, 3.73 Rear Axle Open Diff, Open diff Front Axle, keyless keypad and the optional tow package. The sticker price before “market adjustment” was $43,650.00.
While we had fun getting this truck out in the wild and putting it through its paces, we were always reserved on where, what, and how far we took this non-sasquatch Pavement Princess Bronco. We never aired down because we wanted to protect the tire sidewalls, while the factory enabled G.O.A.T. mode was amazing, we still got stuck in places and the lack of a locker gave us pause whenever we got into tougher off-roading areas. In Moab, with only 8.4 inches of clearance, our options were very limited.
Nearly two years after purchasing this Bronco and seven months into the launch of OVR: Outdoor Vehicle Recreation, it was time to kickoff the 2021 Outer Banks Ford Bronco build. It was time to give this #notamallcrawler a proper look and trail crawling confidence. We don’t want to turn this Bronco into a full-on rock-crawler or a fully built overlander with seat delete systems, but a healthy upgrading of this rig’s capability was definitely in order.
Our goal was to turn the Bronco into a Swiss army knife or a Leatherman multitool of the trail – that is, a multi-functional off-roader that can take on a little bit of everything we throw at it. After drooling over and researching many vehicles over the past two years, it was time to turn our Bronco into an all-purpose overlanding and outdoor activity vehicle, while maintaining everyday driver civility.
To that end, a suspension upgrade was badly needed. The higher-perfomance Sasquatch-equipped Broncos come with a Bilstein suspension system straight from the factory, so it made sense to call on them for upgrades. We learned that we could use the stock shock mounts and just “bolt-on” Bilstein’s B8 6112 front and rear suspension upgrade kit. With a kit ordered up, we impatiently waited for it to arrive. There was a sense of urgency to get the suspension installed as we were planning on driving up to Overland Expo PNW. It would be the perfect long road trip to test out the new wheels, tires, and suspension upgrade.
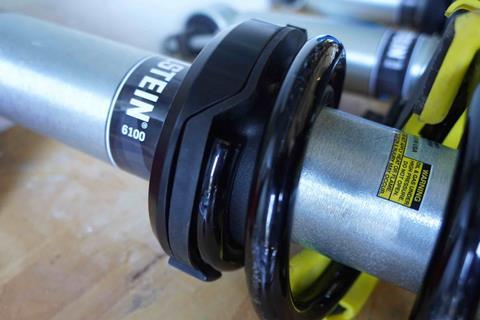
WHY DID I CHOOSE THE BILSTEIN B8 6112?
To get the proper shocks for our purposes stated above, we stopped by the Bilstein booth at Overland Expo West and talked to the experts. While they had lots of options to choose from, it came down to two kits: the B8 6112 which included heavier duty coil springs vs the B8 5100 which only includeed the shocks. After considering the cost and my specfic needs vs features listed below, we chose to go with the B8 6112.
| B8 6112 | B8 5100 | |
|---|---|---|
| Large 60mm piston for increased oil capacity, cooling, and long-term durability | 46mm piston | |
| Monotube design ensures consistent, fade-free performance in all conditions | Monotube design ensures consistent, fade-free performance in all conditions. | |
| Custom engineered cold wound linear springs for enhanced vehicle control and ride comfort | ||
| Available for late model trucks and SUVs which utilize a front coilover suspension | ||
| Made in the USA | Made in the USA or Germany | |
| 60mm digressive piston improves ride comfort and control over rough terrain | Patented digressive valving instantly reacts to changing surface conditions | |
| Adjustable spring seat offers 0-2.75in of lift, depending on the application | OEM certified mounting hardware allows for easy installation | |
| Vehicle specific tuning | Available in various lift heights for multiple applications | |
| MSRP: Front- $900.90, Rear- $900.90 | MSRP: Front- $437.80 (set of 2), Rear- $437.80 (set of 2) |
At the end of the day, the completeness of the B8 6112 won us over. The B8 6112 comes with vehicle specific tuning, includes everything you need (the top hat and jounce are re-used), and met the anticipated lift and level we needed for the 35x12.50 inch Milestar Patagonia XT and the 18x9, 6x135 +12mm offset Black Rhino Kelso. This suspension upgrade would be able to handle the added load of our overlanding gear and other modifications that would ultimately overwhelm the factory suspension.
ANY RUBBING? RIDE IMPRESSION?
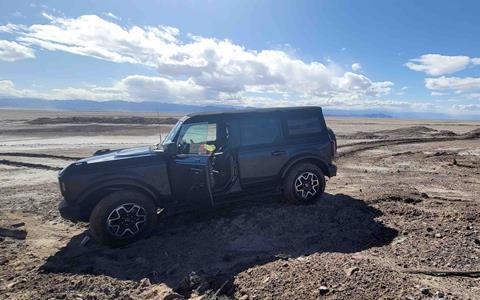
To check for rubbing and experience our newfound ride and handling improvement, we looked for the nearest trail on our trusty onX Offroad app. It pointed us to Del Sur Ridge, a 4/10 technical rating with a moderate difficulty rating about 50 miles from where we were located at the time. We hit Interstate 405 and could immediately feel the improved handling and responsiveness on the highway.
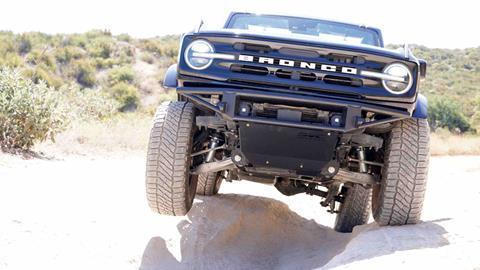
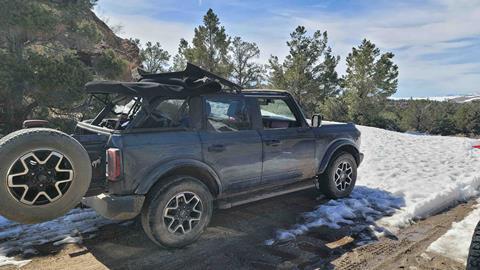
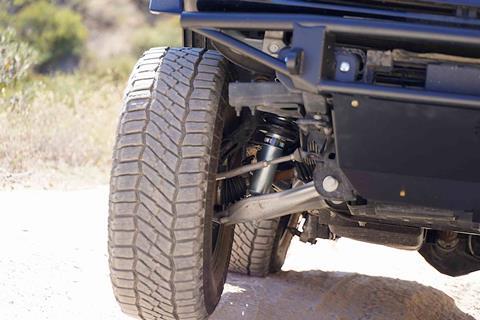
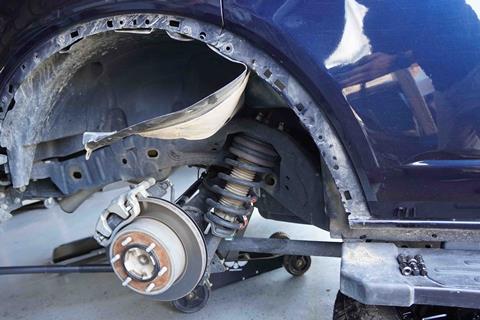
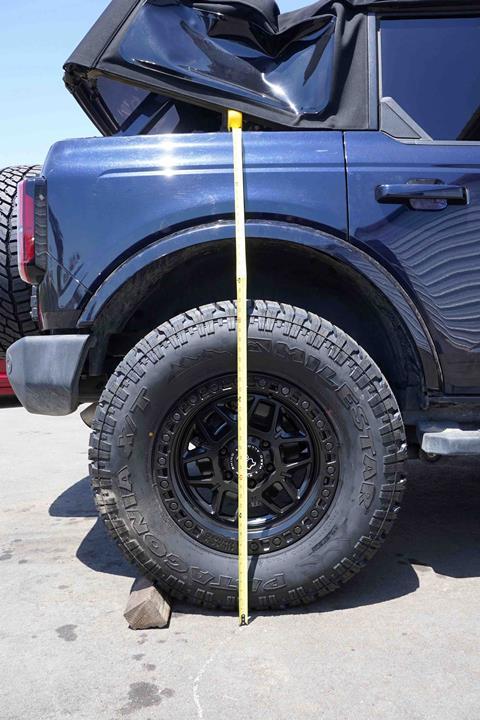
Once on this trail, the combination of the Bilstien suspension and the new wheel and tire package was a night and day improvement in responsiveness and capability over the stock setup. Even as we added additional weight, the Bronco just handled the load much more confidently. We were able to easily traverse ruts that were big and deep in sections and it quickly gave us a chance to fully flex out the suspension. We are able to report the Bronco experienced no rubbing and the improved clearance from 8.4 inches to 11.4 inches allowed to us test out more difficult lines with no issues.
More photos and details on the wheel/tire installation will be linked to this story shortly.
TIME FOR INSTALL
We reached out to a couple of local shops to help with the install but due to the urgency and high demand, no one had an opening for us.
What’s better than having a boat? As the saying goes, A friend with a boat. Same goes with DIY projects. If you don’t have the right tools, find that friend that has ALL the tools.
For us, it was time to call Dan Cornwell of Cornwell Racing in San Diego. We asked Dan if we could come down and use his shop to do the install. Not only was he open to the idea, Dan also took lead and taught us how to drop in the B8 6112 shocks. The best part of this project? Dan didn’t have to MacGyver anything!
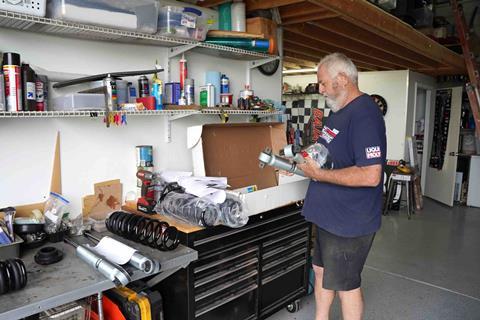
Before you do any home-based or friend-based diy projects on your vehicle, do your research. We don’t want anyone getting hurt during and after any DIY install. During our research, we watched lots of YouTube videos and noticed each creator had a different approach to this project. As such, the steps below are an overview of the project, and you should always refer to the instruction manual that comes with the parts. Another really safe approach is to seek out the professionals at a local reputable shop.
TOOLS YOU WILL NEED
| 1. ½ inch Impact driver |
| 2. A strong jack & 2 jack stands. (Unless you are independently wealthy or have a friend with a lift.) |
| 3. Breaker bar and or a crowbar. |
| 4. 15mm ratcheting wrench to take off the top hat nuts, 18mm sockets (lower strut bolts), 21mm sockets for tie rod nuts, 27mm socket and 30mm wrench (for the lower shock mount nuts & bolts), 35mm for axle nut |
| 5. Hammer to break free the upper and lower control arms. |
| 6. Unless you are He-Man or The Hulk, you will need a spring compressor. |
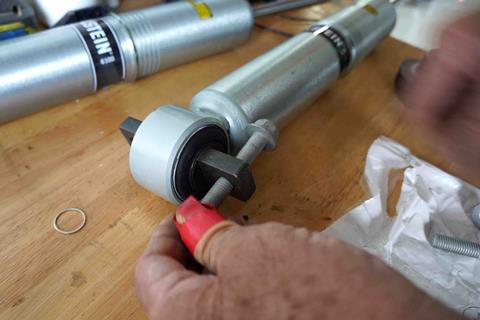
INSPECTING AND ASSEMBLYING THE B8 6112 UPGRADE KIT
1. Before you start taking anything off your vehicle, double check the parts versus the parts list to make sure everything is there. Both front and back.
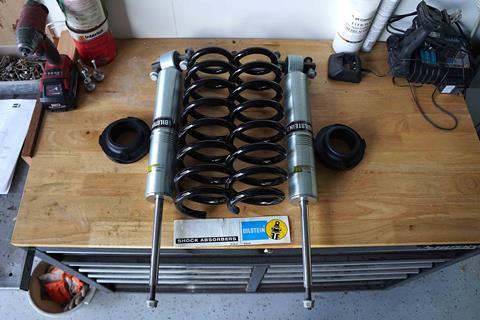
2. Once you’ve verified all the parts are there, loosely assemble all the hardware and verify all the parts fit accordingly.
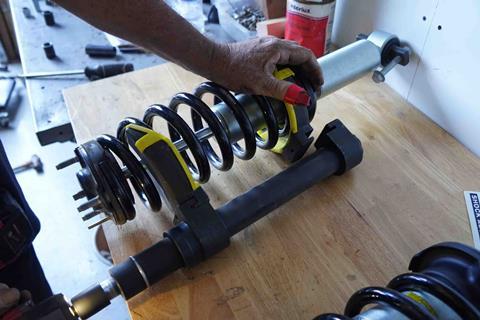
3. Use a spring compressor to get the rest of the hardware on properly.
4. Make sure the top hat bolts, the spring perch and the bottom T-Bar mount nuts are aligned correctly to make sure you don’t have to redo everything.
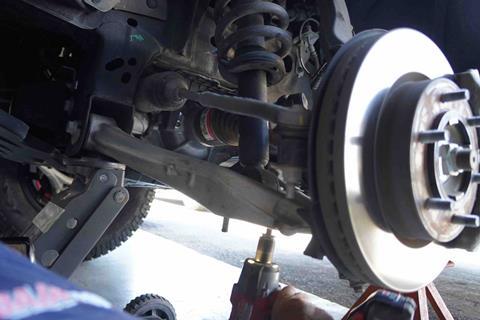
REAR SUSPENSION
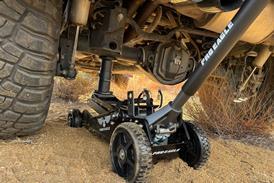
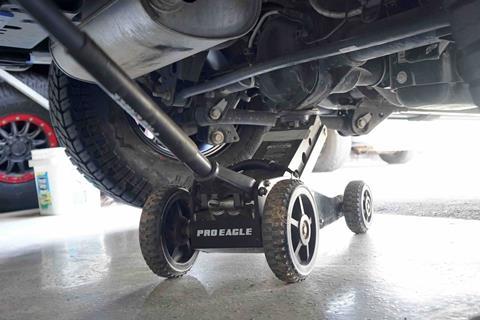
1. We used a trusty Pro Eagle jack; a couple of jack stands and chocked the tires with some blocks to prevent the vehicle from rolling. (Yes, she did roll. In our haste to get it going, we forgot to chock the tires! Yikes! Dumb and dumber here we come.)
2. To get the process started, we took off the tires, fenders, and pulled back the fender well liner (no need to take the whole thing off).
3. Using the 27mm socket with an impact driver and 30mm wrench, take off the lower shock mount nuts and bolts. Using an impact drill will simplify and speed up the job.
4. To take off the three top hat nuts, use a 15mm socket and or a ratcheting wrench.

5. At this point you should be able to grab and pull it out.
6. To install the B8 6112 rear kit, place the new shocks in, align the top pin to make sure you have it directionally correct and put back the hardware in reverse order.
7. Finger tighten all the bolts, then tighten all the bolts with appropriate tool. After, use the torque wrench to tighten to specs.
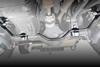
FRONT SUSPENSION
With the fronts, it is a bit more complex but if you get the angles right and use the ratcheting strap correcting, it should go easily.
8. Same as above, grab the front suspension kit and assemble the parts to make sure everything is there BEFORE you tear down your old suspension. (Editor’s Note: We are sure none of us have been caught with our shorts down because we didn’t heed this order… lol)
9. Get your trusty jack, jack stands and blocks in the right places to protect yourself from winning the Darwin Award.
10. Take off the tires, fenders and again, pull back the wheel well liner.
11. Using a 21mm socket, remove the nut on the tie rod and the sway bar inlink nut.
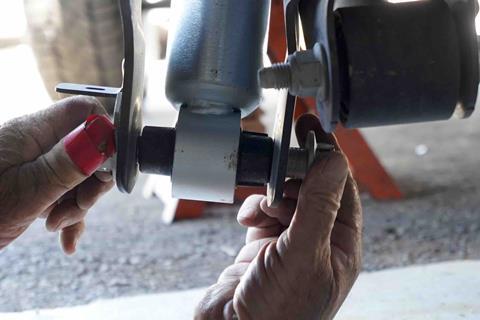
12. Using an 18mm socket, remove the nut from the knuckle on the upper control arm, then remove the two nuts on the lower shock mount located on the underside of the lower control arm.
13. Using a hammer, break loose the upper control arm from the knuckle with a few good whacks to the knuckle. After, break free the tie rod by hammering on the lower knuckle.
14. Using the 35mm socket, remove the axle nut. Reinsert the axle nut part ways and place the 35mm socket back on, and hammer the socket to push back the CV axle until you feel it push back and take pressure off the CV joint.
15. At this stage, you should consider getting a ratcheting tie-down strap to swing away and hold the knuckle and brake assembly in place in order to prevent the CV axle from popping out. Be careful not to stress the brake lines. Using this tie-down method allows us to not have to take extra parts off/on the vehicle.
16. Using a ratcheting 15mm wrench, remove the final three bolts at the top of the shocks.
17. Grab a crowbar, place it between the lower studs and the lower control arm to help release and pull out the strut from the seat.
18. To install your new struts, do the steps in reverse order. Finger tighten all the bolts, then tighten all the bolts with appropriate tool. After reassembly, use a torque wrench to tighten to everything to spec.
RESULT
After all this work, the Bilstein suspension upgrade ended up giving our Bronco 2.5-inch of lift on the front and rear, with each shock on the lowest of the five ride-height settings. It now sits at 41-inches from the fender to the ground and, with the wheel and tire package, has gone from 8.4-inches to 11.4-inches in ground clearance as measured from the ground to the lowest part of the rear differential.
We have a long ways to go before our Bronco is the adventure machine we envision it being, but as more motifications are made, they will be added to this page. If you like our installation articles, please consider adding a comment below.
Read more about OVR’s non-Sasquatch Bronco Project by clicking here.

No comments yet