

This Article Was Originally seen in Issue 1 of OVR (Print & Digital).
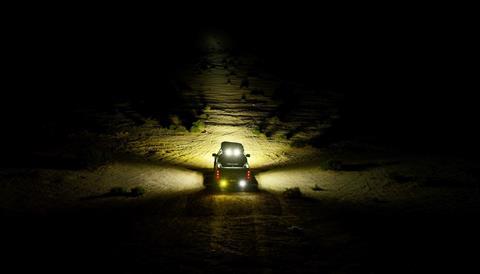
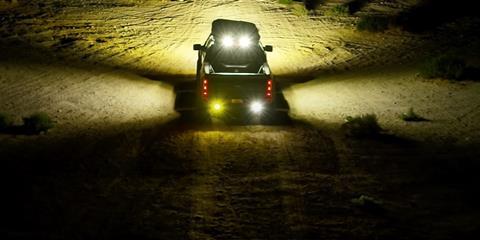
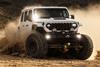
It wasn’t long ago that we found ourselves in the pitch black of night, prerunning a stage for an upcoming Baja race. It was a cloudy night in the Mexican desert, so moonlight was at a minimum, but it didn’t matter. Our rigs managed just fine since they were equipped with the right lighting, even when moving at speed.
Thank goodness we were rolling with our friends from Baja Designs, who know exactly how to light the way forward… and to the sides, underneath, and rearward, too, for that matter. They spoke to us about the importance of understanding lighting zones around our vehicle and how beam patterns were key to setting up an excellent lighting package for any driving situation.
LENS PATTERNS
When planning out your lighting setup, it’s important to pay attention to a unit’s lens pattern. Baja Designs offers lenses that are intended for Wide Cornering, Driving Combo, Spot, and Work/Scene. Each of these lenses allows you to get the most out of your light when used in conjunction with the proper lighting zone, light power, and placement.
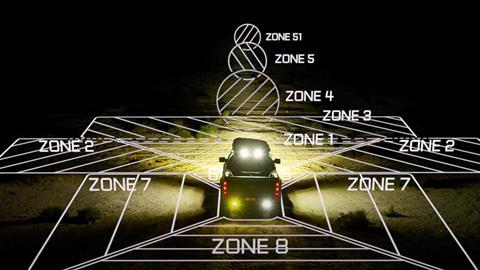
Let’s talk about lighting zones. Baja Designs points out that the needs of every off-roader are different. To that end, they have created a lighting zone system to help drivers mix and match the right lights with the right lenses and in the right mounting positions to achieve the best lighting results. To the layman, it may seem that opting for the highest-power lights would net you the best lighting package for your truck or overlander; however, this may not always be the case. It’s not just about having the brightest lights, but using the right lights in the right way.
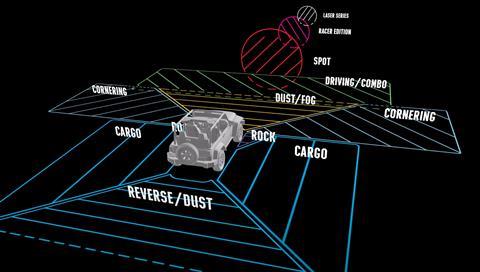
A high-quality and well-thought-out lighting package will allow you to be safer and give you the edge in the dark, but it is important to understand the proper light placement, power, and beam pattern for each lighting zone. Baja Designs breaks down nine different lighting zones that are meant to light up not only the path ahead, but all-around your rig.
Let’s get into it.
ZONE 1: DUST/FOG
This zone is the area immediately in front of your vehicle. Zone 1 lighting illuminates the area directly ahead, for use during rainy, snowy, or dusty conditions. Zone 1 lighting placement is gernally mounted low on the bumper. This LED fog light’s low placement eliminates any glare that can potentially reflect back at you.
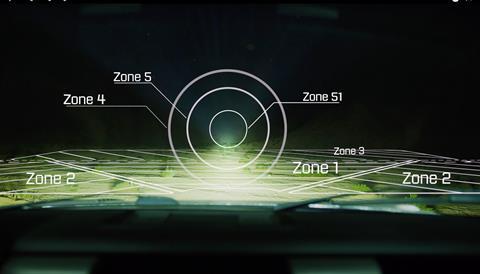
ZONE 2: CORNERING
Mainly there to provide light to aid your peripheral vision, Zone 2 is all about cornering and peripheral light, which is necessary to drive comfortably at speed. Lights in Zone 2 are typically mounted on the outside of the bumpers or mounted off the A-pillars of the vehicle. Wide-pattern lighting is not recommended on the A-pillar unless angled outward, as it could result in perceived glare from the hood.
ZONE 3: DRIVING COMBO
This is your primary driving light and the most important zone to start with when building a balanced lighting package. Lights in Zone 3 are typically placed in the center of the vehicle, either on the bumper on in the grille. It is suggested that 80% of your lighting package stay below the hood line for the best results.
ZONE 4: SPOT
This zone is your first level of long-distance lighting. Lights intended for this zone will give you the viewing distance needed to travel at speed, and to see safely down the road or trail. Unlike Zone 1, Zone 2, and Zone 3, which are positioned lower on the front of your vehicle, Zone 4 is mounted higher, either on the A-pillar or on the roofline. This highline placement ensures that the glare from particulates, fog, and dust are reduced. Zone 4 LED spotlights should only be used when absolutely necessary to reduce power consumption and vision fatigue.
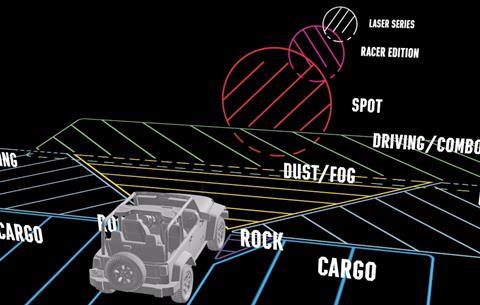
ZONE 5: RACER EDITION SPOT
This zone is for going fast, really fast, something most of us probably won’t be doing in our rooftop-tented SUVs, but it’s what Baja Design excels at. Zone 5 is implemented when approaching triple-digit speeds, or in instances when distance penetration becomes necessary. Lights in Zone 5 benefit from being placed higher up on your vehicle, as the tighter overall beam from these lights helps to negate what would otherwise be a concern of glare coming back into the cab.
ZONE: 6 ROCK LIGHT
Great for spotters to see what you’re driving over, doing roadside repairs, or even as a campsite light, this zone illuminates the wheel wells, undercarriage, or any other part of the vehicle that can benefit from great visibility while moving through tight spaces and jagged terrain. Lights in Zone 6 are entirely user-dependent, but typically entail one per vehicle corner. Mounting inside the wheel well or bumpers achieve the best results.
The versatility of these small lights allows for their mounting inside vehicle roll cages and tailgate panels as well.
ZONE 7: CARGO
Another one that’s great for campsite use, this zone is important for drivers who need quick access to tools and cargo in and immediately around the vehicle. Zone 7 light placement should typically be on the roofline and aimed downward for best projection. Ultimately, cargo light positioning is based on user preference.
ZONE 8: BACKUP/ REVERSE
Because we’re not always moving forward, this zone is crucial to keeping the backside of your vehicle safe. Whether reversing on the trail or leading a pack through the dust, you will want the correct lighting solution. Zone 8 for reverse or dust lights use two completely different locations but share one common direction: facing rearward. Reverse lights are typically mounted under or inside of rear bumpers. Dust lights are mounted higher up on the vehicle, such as the roofline. The intent is to have these lights high above the dust as possible to provide the greatest visibility.
ZONE 51: LASER SERIES
The ninth zone, named Zone 51 by Baja Design, is for those looking to pierce the night with a powerful pinpoint laser light. Most of us won’t need this one, but it is used by search and rescue teams and Baja racers to light up areas at great distances. This zone would be one of the last additions to your lighting package. When you have optimized your entire package and still need some extra punch into the distance, you may want to look into Baja Design’s Laser Series powered lights. Zone 51 light placement is similar to zones 4 and 5. With long-distance illumination being the goal of zone 51 lighting, you want to avoid mounting these lights too low to prevent them from being obscured by rocks and brush.
In 1992, Alan Roach, the lead engineer, founded Baja Designs in San Diego, California, driven by his passion and enthusiasm for off-road pursuits.
For more information, visit Baja Designs at: bajadesigns.com.

No comments yet